· school computer lab
Running a School Computer Lab with Few Computers: A Practical Plan
16 min read
You open the lab, count the machines that start, and count the learners filing in. The numbers don't match. Some learners can already type, save a file and find information online. Others are still learning how to hold a mouse and sign in without help.
That gap doesn't mean the period is lost. It means you can't run it like a class where every learner has a computer and starts from the same point. You need a routine that's small enough to repeat every week, clear enough for learners to follow without constant instructions, and fair enough that the quiet learner at the back gets real practice too.
Running a school computer lab with few computers works when you treat the machine as a shared station, not a seat. You plan the rotation first, keep tasks short, give pairs clear roles, and make the offline work count as learning. A learner planning on paper, explaining the next step to a partner, or practising keys on a printed keyboard isn't waiting. That learner is preparing to use the computer well when the turn comes.
Table of Contents
- Work Out Your Rotation Before the First Lesson
- Start Each Learner at the Right Level
- Run a 65-Minute Lab Period With Paired Roles
- Protect Learner Accounts and Keep Devices Working
- Collect Evidence of Skills Across Several Lessons
- Set Up Your First Week of Lab Rotations
Work Out Your Rotation Before the First Lesson
Start with arithmetic, not with the lesson plan. Count the computers that power on, open the programme you need and accept a login this week. Skip the inventory list, the machine waiting for a charger, and the one with missing keys. Then count the learners who'll be in the room.
Say you've got a class of 40 and 10 working computers. If learners work in pairs, 20 learners can be on machines in one round. Two rounds give everyone a turn. The other pairs need a real task during their off-computer round, then the groups swap.
Use working machines as your base
That caution fits the national picture. The Ministry of Education's Basic Education Statistical Booklet 2020.pdf) reported only 32% of public secondary schools had functional internet connectivity, and surveys over the years have consistently found far more learners than computers in Kenyan schools.
You don't need national figures to know your own room. Planning for one device per learner creates disappointment the day a machine fails. Planning from working machines gives you a timetable you can defend, because every number in it was tested on the equipment in front of you.
Rounds needed for a shared lab rotation
| Class size | Working computers | Learners on computers per round | Rounds for everyone to get a turn |
|---|---|---|---|
| 40 | 10 | 20 | 2 |
| 50 | 12 | 24 | 3 |
| 60 | 8 | 16 | 4 |
Write the round order on the board before learners sit down. Put pair names under Rotation A and Rotation B, or A, B, C and D if your numbers need more rounds. Learners settle faster when they can see their turn is coming and what they'll do first.
Practical rule: If a machine doesn't work today, it isn't in today's rotation. Move it aside and adjust the rounds at once.
Treat the off-computer round as learning time, not waiting time. The linked offline task should produce something the pair needs at the machine, whether that's a drafted paragraph, a worked-out sequence of steps, or questions they've agreed to search. When both rounds carry real work, learners stop watching the clock for their turn.
Explain the split in plain words at the door. One group works at computers as pairs. The other group completes the linked offline task. Then they swap. Nobody should discover the system by watching classmates get machines first.
Start Each Learner at the Right Level
Don't start a new group with the same lesson for everyone. Run a short, ungraded diagnostic first. Ten minutes is enough to check whether a learner can sign in, control the mouse, use basic keys, open a programme and save a file with a clear name.
Tell learners there's no score. You're finding the right next task, not ranking them. That matters for a learner who's meeting a computer properly for the first time and doesn't want the whole class to know.
Sort learners into three starting points
Use the diagnostic to place learners in one of three groups. Keep the group names private if naming them would embarrass anyone. You can code them by task colour or number.
- Starting basics: Mouse control, clicking and dragging, finding letters and numbers, and signing in and out safely.
- Core tasks: Typing short text, opening and closing programmes, creating a folder, saving and finding a file again.
- Extension tasks: Searching for information, choosing a useful result, building a simple document and explaining choices.
If learners need a refresher they can revisit at their own pace, a step-by-step guide to computer basics for beginners can support the first group without taking your demonstration time away from everyone else.
Build mixed-ability pairs from the results. Put a confident mouse user with a learner who needs support, but don't pair the fastest learner with someone who'll never touch the keyboard. Avoid letting learners choose friends at the same level. One pair races ahead, another pair gets stuck together, and you spend the period rescuing the same table.
Teach one topic with three versions of the task. Say the topic is saving work. The basics group saves a file with a given name in a named folder. The core group creates the folder, types a short paragraph and saves it. The extension group finds a saved file, renames it sensibly and explains how another learner could locate it. The class shares a theme, but nobody is pretending to work.
Set the room for focus before the first learner sits down. Keep audio low, give headphones to learners who need sound, and enlarge text for learners who struggle to read the screen. Check the volume and display settings during your device check, not after pairs have started asking for help.
Repeat the diagnostic every few weeks. Skills change quickly once learners get regular hands-on time, and a learner who needed mouse practice in week one may be ready for document work by week four.
Run a 65-Minute Lab Period With Paired Roles
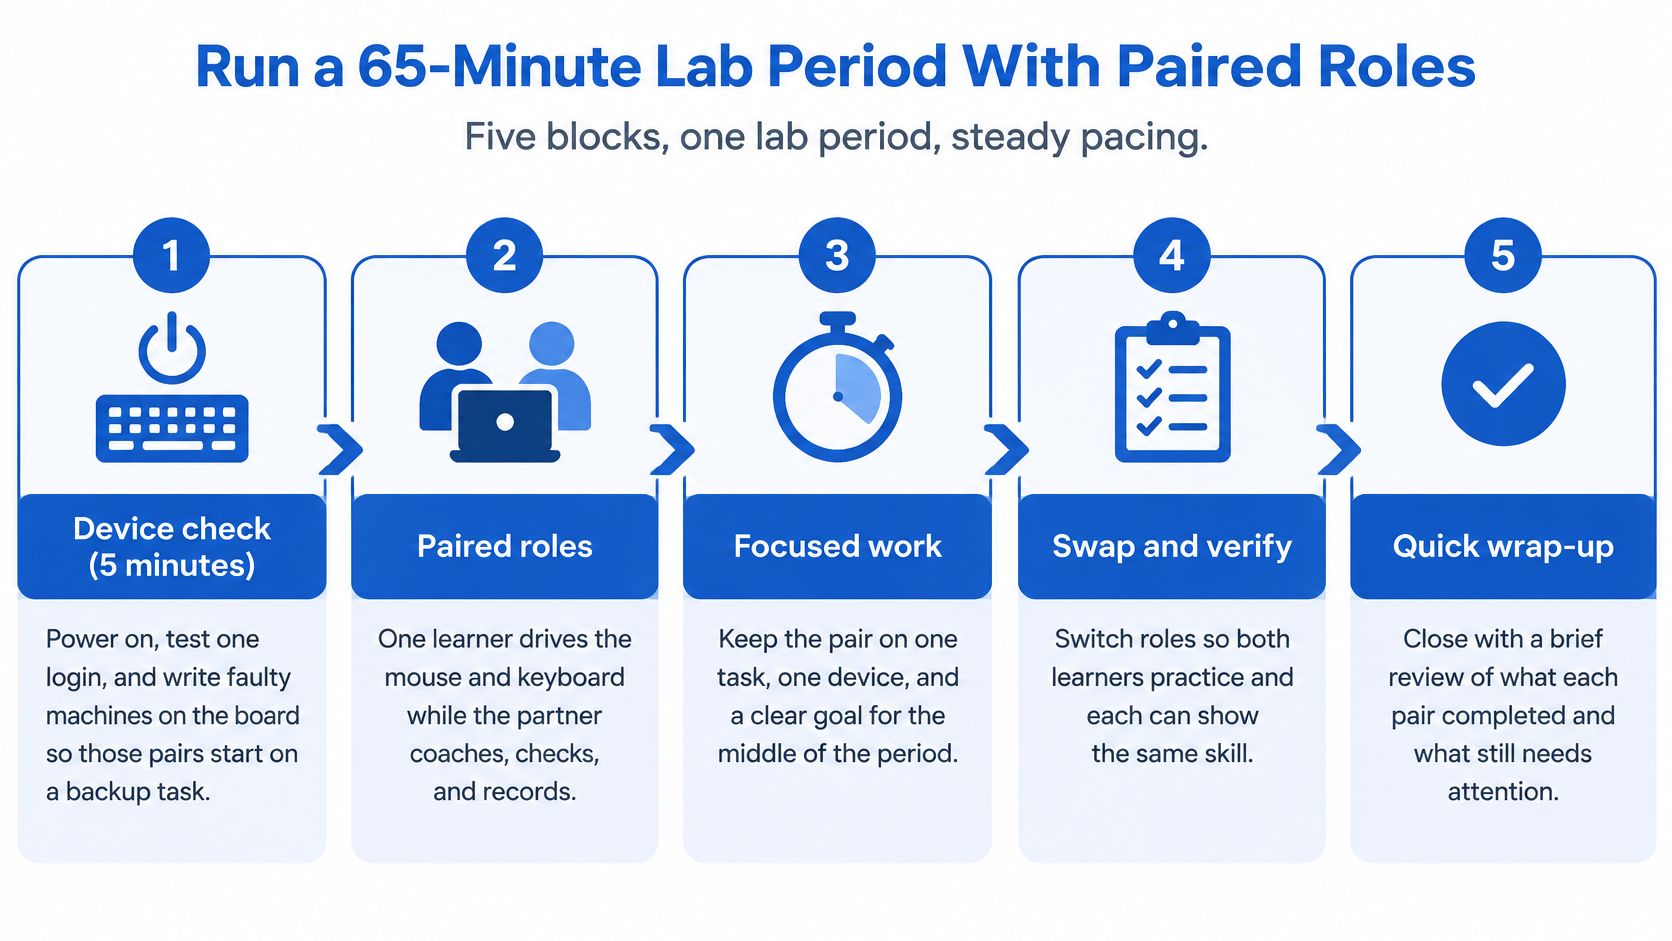
A fixed shape saves you from rebuilding the period every week. The five blocks below give you a demonstration, two rotations and individual evidence without turning the lesson into a rush.
Here's the shape at a glance before you run it in the room.
An independent study of digital-literacy training in a Kenyan school used eight working desktop computers for roughly 200 students, supplemented by six laptops, with learners taught in groups of 18 to 39. It describes lab sessions built around a device check, teacher demonstration, two hands-on rotations and final evidence capture.
Minute-by-minute lab period
| Block | Minutes | What Happens |
|---|---|---|
| Device check | 5 | Power on, test login, mark faulty machines |
| Teacher demonstration | 10 | Show the task step by step on the projector or board |
| Rotation A | 20 | Pairs on computers, other groups on offline tasks |
| Rotation B | 20 | Groups swap stations |
| Evidence capture | 10 | Saved file, screenshot or paper exit ticket |
| Total | 65 | Fits a 60 to 90 minute period |
Run the five blocks in order
Device check, 5 minutes. Power on every machine in the rotation and test one login. Write faulty machine numbers on the board. Pairs assigned to a faulty machine start on paper instead of standing around while you troubleshoot.
Teacher demonstration, 10 minutes. Show the whole task once on a projector, a large screen, or the board if you haven't got projection. Leave the steps visible. Keep the task small enough to finish in one rotation. If learners can't repeat the goal in one sentence, the task is too big.
Rotation A, 20 minutes. The first pairs work at computers. Offline groups plan the same task on paper, discuss a printed source, or practise typing on a printed keyboard. Their work should feed directly into their computer turn, such as drafting sentences they'll type or listing search words they'll use.
Rotation B, 20 minutes. Groups swap stations. Learners coming off computers check, correct or explain what they made. Learners going onto computers already have a plan, so they don't waste half their turn deciding what to write.
Evidence capture, 10 minutes. Each learner saves a file, takes a screenshot, or completes a paper exit ticket. The evidence belongs to one learner, not just to the pair.
Give each pair a driver and a navigator
Name one learner the driver. The driver controls the keyboard and mouse. Name the other learner the navigator. The navigator reads the instructions aloud, explains the next step, watches for errors and checks the finished work.
Swap the roles halfway through the computer activity. Use a timer, a bell, or a clear raised-hand signal so you don't have to negotiate with every pair. Write both names on the rotation board beside the machine number.
A Kenya News Agency report on the Digital Literacy Programme in Narok County recorded 615 public schools receiving 34,349 learner devices, 1,230 teacher devices, 615 digital-content server wireless routers and 615 projectors, an average of about 56 learner devices per school. Even at that scale, a school can't assume every learner in a class can use a device at the same time.
Don't let the least confident learner always navigate. Without a timed swap, navigator becomes a polite word for spectator.
Watch for mouse dominance in the first few minutes. If one learner reaches across, gives every answer and won't release the keyboard, reset the roles early. Say who drives for the next five minutes and move on. Don't wait until the partner has disengaged.
The short clip below is useful for seeing how a timed shared-computer routine can look before you adapt it to your room.
Offline pairs need roles too. One learner can record the plan while the other reads the source and underlines key words. On a printed keyboard, one learner calls out letters or words while the partner finds the keys, then they swap. The point is equal participation, not identical activity.
A successful rotation doesn't mean every pair produced polished work. It means every learner had hands-on time, followed a role, and can name at least one step they completed themselves. If a learner can only describe what the partner did, that pair needs closer watching next time.
Protect Learner Accounts and Keep Devices Working
Shared computers only work fairly when each learner's work stays in that learner's account. Make sign in, sign out part of the lesson routine, and say the steps aloud until learners can repeat them without prompting.
- Sign in only with your own account. Never use a classmate's details, even if your login is slow.
- Never save passwords in the browser. Choose the option that declines saving, every time.
- Sign out before leaving the computer. Closing the lid or walking away isn't signing out.
- Tell the teacher at once if an account is still open. Don't continue working inside it.
This isn't just tidy classroom management. Kenya's Data Protection Act states in Section 33 that personal data relating to a child may not be processed unless consent is given by the child's parent or guardian and the processing protects and advances the child's rights and best interests. Our plain-English overview of the Kenya Data Protection Act for schools can help you explain the background to colleagues.
If one learner's progress lands in another learner's account, the record is wrong and trust drops quickly. Learners also need to know that finding an open account doesn't make it theirs to explore. Sign it out with the teacher present and note it.
Keep a simple device register
Use one exercise book or spreadsheet for the lab. Record the machine number, who used it, charger or battery problems, faults found and when it last worked properly. Add a weekly inspection, a charging timetable and a repair log. A single failed computer can break a whole rotation, so remove it from service and record the fault the same day.
If a shared machine starts showing pop-ups, unknown programmes or browser changes, take it out of the rotation while it's checked. For careful clean-up steps, 247TechTeam's malware removal guide from 247TechTeam is a practical reference to work through before the machine returns to learners.
Common lab faults, causes and quick fixes
| Symptom | Likely cause | Quick fix |
|---|---|---|
| Will not power on | Flat battery or unplugged charger | Check the plug and power strip, then try another charger |
| Slow to start | Full storage or pending updates | Clear storage, restart, log the repair if it persists |
| No sound | Muted or wrong output device | Check volume, select the correct output, test headphones |
| Keys not responding | Loose cable or dust | Reseat the cable, try another port, clean the keyboard |
| Text too small for a learner | Display setting | Enlarge text in settings for that learner |
| Account left open | Learner did not sign out | Sign the learner out, record it in the register, check the saved work belongs to them |
Keep at least one offline copy of the lesson and any assessment sheet on your own device or printed on paper. Connectivity and technical support can't be assumed, and your class shouldn't lose a period because the network is down.
Collect Evidence of Skills Across Several Lessons
Pair work can hide individual gaps. A confident driver can make a pair look competent while the navigator hasn't yet learned to save a file, use the mouse accurately, or recover from a mistake. Your evidence system needs to show what each learner can do alone.
The four methods below work together. You don't need all four in every lesson, but across several lessons each learner should produce evidence in more than one way.
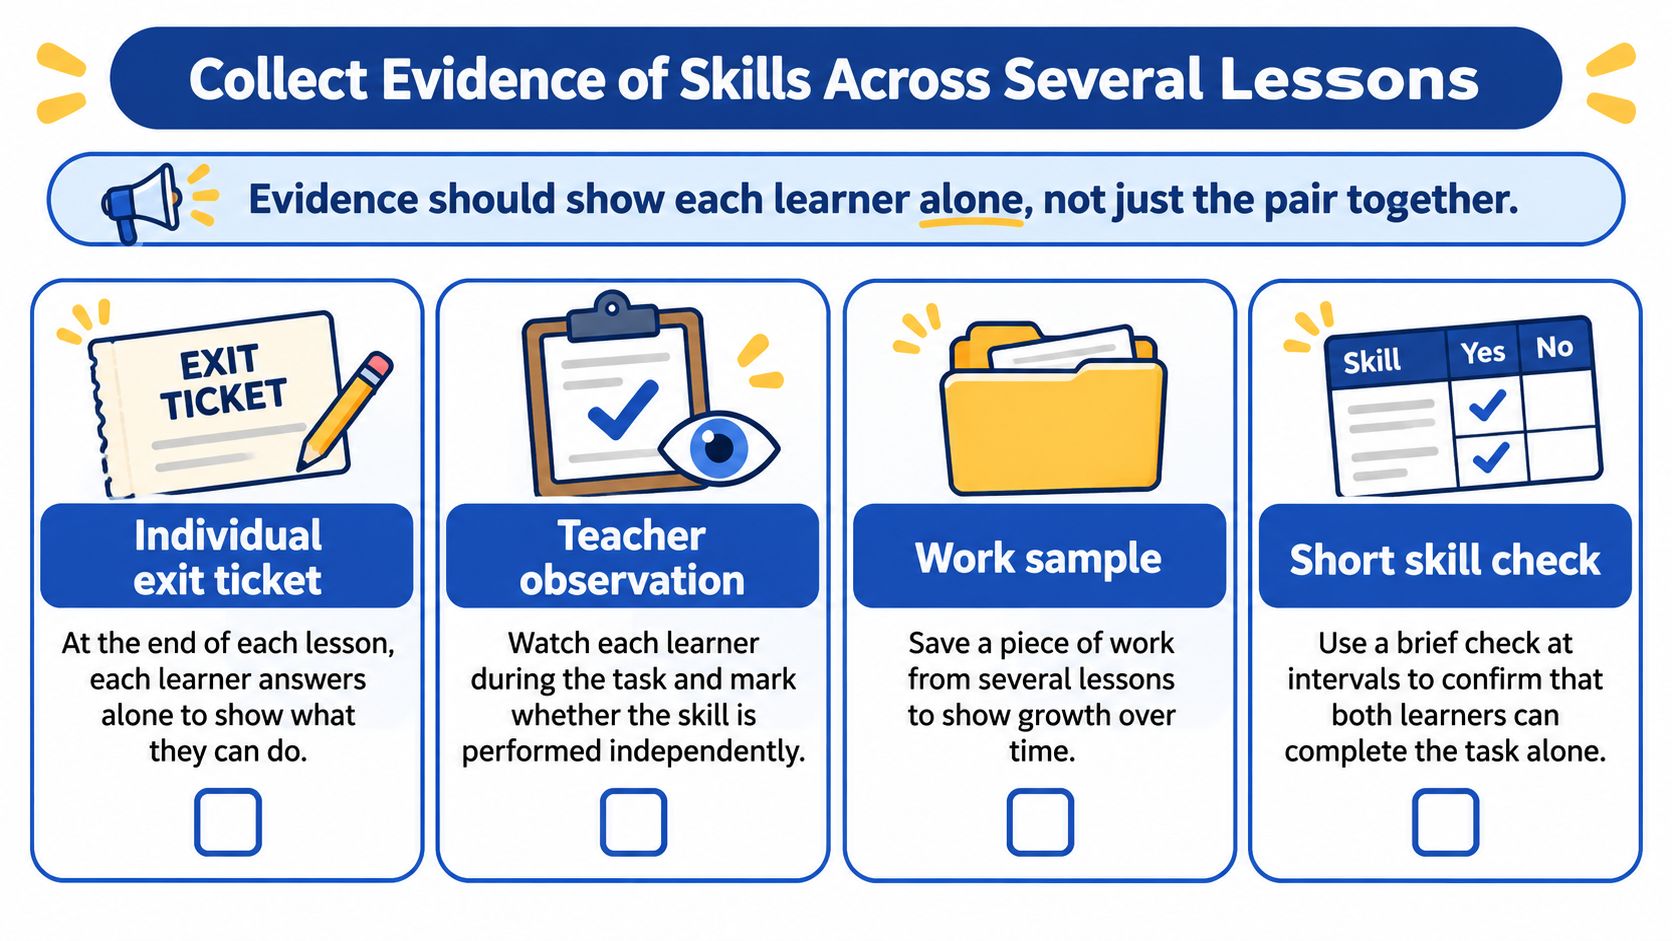
- Individual exit ticket: Each learner writes or saves one answer alone, such as the steps used to save today's file.
- Timed micro-demonstration: A learner completes one action while you watch, such as creating a folder and moving a file into it.
- Learner skills record: You track small actions seen over time rather than judging from one polished product.
- Random role-based check: You ask the navigator to explain what the driver just did and why.
Track observable actions, not vague labels. Useful actions include opening a programme, entering text, saving work, finding information, naming a file clearly and explaining a choice. A simple grid with learner name, date, task and action seen is enough. If you build samples into a learner file over the term, our guide to portfolio assessment in practice shows how to keep that process manageable.
That evidence-over-time approach fits the direction described in a Kenya News Agency report on the digital literacy rollout, which targets 10,382 public junior schools across all 47 counties with interactive smart boards and teacher laptops in support of the CBE curriculum. Devices aren't the goal by themselves. Learners need repeated chances to show digital literacy, problem-solving and collaboration.
Before teaching a new competency, give a short pre-test. After instruction, give an equivalent post-test. Decide your rubric before the lesson, such as three of four steps completed without help, and report mastery as the share of learners meeting that rubric. Attendance at the lab isn't mastery.
Review your grid every Friday. Circle learners with no recent evidence and call on them first for micro-demonstrations the following week. That small habit stops quiet learners from hiding inside successful pairs.
This classroom evidence supports your teaching decisions and learner feedback. It doesn't replace official CBC assessment, and you shouldn't present it as if it does.
Set Up Your First Week of Lab Rotations
Keep your first week modest. You're teaching the routine as much as the computer skill, so choose tasks learners can finish and repeat the same structure until the movement between stations feels normal.
Your Monday to Friday plan
- Count working machines and write the rotation board. Names, pairs, machine numbers and offline stations go up before learners enter.
- Run the timed period. Start with the device check, demonstrate one small task, then run two rotations with a halfway role swap.
- Collect one evidence item per learner. A saved file, screenshot or exit ticket is enough for week one.
- Review the grid on Friday. Note faulty machines, learners with no evidence, pairs that didn't share fairly and starting groups for next week.
With few machines, the week lives or dies by preparation done before Monday. Keybaki's Teachers plan is free at KES 0 per teacher and includes unlimited lesson planning and a classroom presenter, so you can plan the full week in three steps: browse the library, attach resources to build lesson plans, then schedule them on the timetable. A reminder arrives before each scheduled period, and the presenter reflows for a projector, tablet or phone screen, so one machine at the front can carry the demonstration while pairs wait their turn.
Treat the offline stations as equal learning time, and make them depend on preparation rather than connection. Lesson plans, bookmarked library items and the classroom presenter work offline once they have been opened online at least once, so open everything you need on Friday afternoon and the lab still runs when the connection drops mid-period. Two practical details help here. Keybaki stores only the minimum data needed to run the service, and most accounts today belong to individual teachers and parents rather than whole schools, so a single teacher can start without waiting for a school-wide rollout.
I would judge the first week by fairness and calm, not by how much content you covered. If every learner drove for part of a rotation, completed an offline task with a purpose and left evidence, your system is working. Add harder tasks after the routine holds.
Start your next lab week with the working-machine count, named pairs and one small task every learner can evidence. Visit Keybaki to set up your free teacher account, attach this week's resources to your timetable and prepare a calmer first rotation for your class.
Comments
Loading…